It is one thing to install a spitter in a figure you are building when you are not worried very much about the paint job, as you will be painting the figure any way. But what if you goof up the paint job on a finely painted Selberg figure? There are a number of figure makers that would not feel comfortable trying to fix that.
Fortunately for me, I had cast a variety of body parts for Selberg Studios for a number of years, some of which included painting the parts after they were cast, in the Selberg style. I don't back down from challenges very often, and I didn't when contracting to do this work for Tim. Here's one of the batches of hands that I cast for him and painted in that style. . . .

Funny thing. Even though in my mind I knew I could repaint the whole head if I messed anything up, I still felt nervous, and greatly desired not goofing up even a small area on that face. So that was the first part of the challenge. The second part of the challenge was how to install the spitter assembly inside the head without disturbing anything else. Here's a before picture of the inside of the head. . . .

You will notice that you can not see the back side of the upper lip. That is exactly where the spitter needed to go on the inside of the head. I used a dental mirror to see best how to proceed. I could also feel the inside of the upper lip area through the front of the open mouth.
I drilled a pilot hole and then the final hole size for the brass tubing that would be installed, from the outside front of the cast head. That was the most nerve wracking part. Here's a picture of the inside after I installed the spitter hard ware. . . .

I installed a support rod that had a bracket soldered to it, which in turn had the spitter brass tubing solder to the bracket. The blue tubing goes down inside the neck to another brass tube that goes down the control stick.
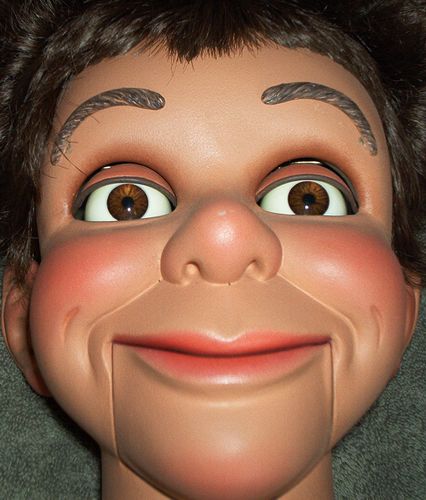
The final challenge was cutting a precision channel into the control stick for the brass tube to go into. Okay. I was wrong. THAT was the most nerve wracking part! Finally, here's a picture of the spitter as seen from the front of the face. . . .

Looks like it was always meant to be there. Whew! A great sigh of relief when all was said and done. But as you can see, no damage to the paint job on the face and the spitter is small and unobtrusive. You can see it easily in the photo, but from a performing distance, hardly noticeable at all.
In closing, I have to say that I enjoyed working for Selberg Studios for all the years that I did. Tim was a very nice gentleman to work for. He told me he only hired the 'best of the best', and that surely didn't hurt my feelings any. (grin)
I had to stop though, as I had some very serious health problems at that time. Because of that it was impossible for me to keep up with all my own work and at the same time try to help supply a top figure making studio. I do have some fond memories of all that I did and I learned a lot working for Selberg Studios. Thanks for that fine experience Tim!
Mike Brose
No comments:
Post a Comment