Tuesday, December 20, 2011

Fresh New Face - Update. . . .

Sorry to have been so quiet, but it has been blindingly busy here! No complaints however. Coming up for air to post an update on the newest member of our high quality figure line.

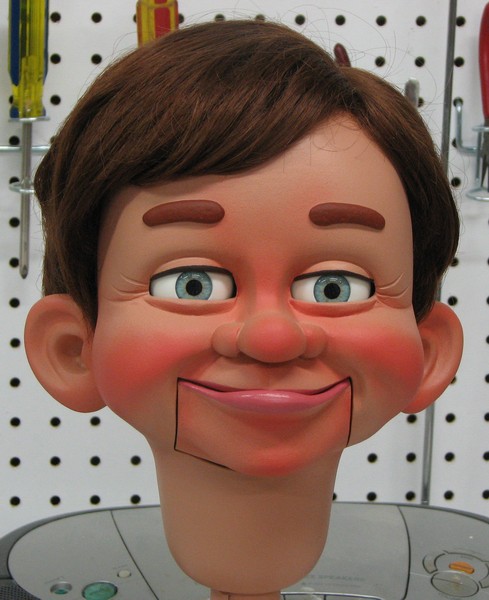
In a previous post I mentioned about a new character named 'Sparky'. We are very excited to announce that he can now be ordered and you can get the full details about him on our finished figures pages. . . .


Click on his photo and that will take you to the 'Finished Figures' web page, or you can click on the link below. . .


Well, that's it for now. When the year end rush has calmed down here and I'm a little more caught up, I will try to post more often again with items of interest.

Monday, November 21, 2011

Why I Do What I Do. . . .

Core Cast Urethane Heads. What does that even mean?!? It means a highly specialized mold that forms the outside and the inside at the same time when a head is cast in urethane. Advantages?  Strength/Quality of the casting (which is very important to me) and ease of use when building a figure. We'll talk about these in a moment. Another reason for going this route?. . .

Being the first kid on the block to have a professional rotocasting machine (1998).......


... I experimented early on with rotocasting heads, figuring it would be a quick and easy way to cast quality heads (it can be if done correctly). But it had its downsides. Unusually thick spots, paper thin spots, and large bubbles or voids in places you don't want them. All such defects are a sign of inexperience with rotocasting, and require some skill and a bit of experience to overcome.

I don't know about anyone else, but I'm not a big fan of repairing a newly made head casting first thing.   Also, when there are paper thin spots, this is a weak area in the casting. If a head takes a good hit or a fall, that is where it will break.

Urethane gets its strength from having the proper thickness (minimum 1/8" - 3/16" thick). Paper thin areas can be about as brittle as a soda cracker. Sure, you can patch it up with some epoxy putty, but it is very easy to make a 'marginal' bond (the repair can pop off of there) if not done correctly, and if so, that area is still fragile and susceptible to breakage. The repair may look like it is strong, but is it? Do some *destructive* testing to be sure.

Is there a better, more consistent process? Yes! Enter Core Cast urethane heads. Below is a photo of a core cast head..........

Core Cast Urethane Head with proper thickness throughout

I knew there was a better way.  When I cast a head using a core cast mold, it is a stronger casting right off the bat, as there ARE NOT ANY too thick or paper thin spots anywhere. No whopping bubbles. I have full control of how thick the casting is throughout.

If you look inside the head and hold it up against a light, you can readily see there are no thin spots in it. No defects to repair! Try that with an improperly rotocast head. You will have an *a-ha* moment!

What's the other reason I core cast my urethane heads? Simple answer. Ease of use. The eye and mouth areas are already cut out, the trap door is already cut out, little if any fitting of the jaw, and the control stick hole is already done.......


That's only part of the picture. Then there are the advantages on the inside..... 


 There are flanges built into the casting for the jaw pivot rod. I don't have to guess where the rod needs to go, and the flanges provide a rock-solid area to glue to with no worry about a marginal epoxy putty bond failing (if not done correctly, they surely can fail). The eye tray flanges also provide a very secure area to glue to.

Besides peace of mind, these features save a TON of time. I am one of the few full time figure makers out there. How long it takes to build a figure is key to being successful and eating regularly! (grin) I did it the hard way for a number of years, but got very tired of repeatedly cutting, drilling, fitting, etc., when it just didn't have to be that way. 

Why don't a lot of others do core cast urethane? There are few mold makers, let alone figure makers that know how to do this. It is a complex mold, and took some 37 years of mold making experience (47 years now) to figure out my exact process. I've got it down to a science now, as they say.  If it were an easy thing to do, everyone would be doing it.

Sorry its been so long between posts, but it is very busy here, and I'm juggling quite a bit at the moment. Its a good thing I know how to juggle......

Saturday, October 22, 2011

Speaking of Spitters. . . .

Alterations on existing figures can always be a challenge, and this is especially true when doing these alterations on another figure maker's fine creation. Here was the challenge on a past project. The customer requested the installation of a spitter in an existing Selberg 'Sammy' ventriloquist figure. Here is a 'before' picture. . . .


 It is one thing to install a spitter in a figure you are building when you are not worried very much about the paint job, as you will be painting the figure any way. But what if you goof up the paint job on a finely painted Selberg figure? There are a number of figure makers that would not  feel comfortable trying to fix that.

Fortunately for me, I had cast a variety of body parts for Selberg Studios for a number of years, some of which included painting the parts after they were cast, in the Selberg style. I don't back down from challenges very often, and I didn't when contracting to do this work for Tim. Here's one of the batches of hands that I cast for him and painted in that style. . . .


Funny thing. Even though in my mind I knew I could repaint the whole head if I messed anything up, I still felt nervous, and greatly desired not goofing up even a small area on that face. So that was the first part of the challenge. The second part of the challenge was how to install the spitter assembly inside the head without disturbing anything else. Here's a before picture of the inside of the head. . . .


You will notice that you can not see the back side of the upper lip. That is exactly where the spitter needed to go on the inside of the head. I used a dental mirror to see best how to proceed. I could also feel the inside of the upper lip area through the front of the open mouth.

I drilled a pilot hole and then the final hole size for the brass tubing that would be installed, from the outside front of the cast head.  That was the most nerve wracking part. Here's a picture of the inside after I installed the spitter hard ware. . . .


I installed a support rod that had a bracket soldered to it, which in turn had the spitter brass tubing solder to the bracket. The blue tubing goes down inside the neck to another brass tube that goes down the control stick.

The final challenge was cutting a precision channel into the control stick for the brass tube to go into. Okay. I was wrong. THAT was the most nerve wracking part! Finally, here's a picture of the spitter as seen from the front of the face. . . .


Looks like it was always meant to be there. Whew! A great sigh of relief when all was said and done. But as you can see, no damage to the paint job on the face and the spitter is small and unobtrusive. You can see it easily in the photo, but from a performing distance, hardly noticeable at all.

In closing, I have to say that I enjoyed working for Selberg Studios for all the years that I did. Tim was a very nice gentleman to work for. He told me he only hired the 'best of the best', and that surely didn't hurt my feelings any. (grin)

I had to stop though, as I had some very serious health problems at that time. Because of that it was impossible for me to keep up with all my own work and at the same time try to help supply a top figure making studio. I do have some fond memories of all that I did and I learned a lot working for Selberg Studios. Thanks for that fine experience Tim!

Mike Brose

Tuesday, October 4, 2011

Character Concepts. . . .

When creating a new character, the first thing that a figure maker usually does is create a 'character concept' before doing anything else. There are a number of ways this can be done. One can create concept drawings, a concept maquette (a scaled down sculpture, half size or smaller), or do a quick sculpt in some soft clay.  I have done all of these at one time or another.

So some sort of concept art of the face (if the body will be special, that can be done too) is created to see if the character idea is viable or desirable, before actually making the finished figure. Nowadays there are new tools at our disposal. Enter digital sculpting! In many ways it is like creating a drawing, only the appearance is 3D, so you can easily see the character at all angles while creating the concept art.

Here's a short video of a character concept I did with a free digital sculpting program called Sculptris.....


Sculptris has various sculpting tools that have similar actions to what would be done with real clay. It starts out as a sphere, and by using the tools, you can pinch, pull, push, crease (and more) to create eyes, ears, nose, lips, chin etc. You can rotate the head in any direction so you can see all the features at different angles while you work. Right or left sides, front or back, top or bottom.

You can now see your character concept as if it were in solid form, which is an advantage over a 2D concept drawing. I purposely did not super refine, nor correct the jaw line (I can see that needs some changes) as I will do that when I sculpt the character in real clay. But now I have the perfect reference for sculpting in clay! I can either print out photos (screen print) or put Sculptris on my laptop, and change angles as needed.

Below is a quick sketch I did for a concept of a grumpy character.


There's a lot more detailing I'd probably do on him yet. But as you can see, you can emulate different materials in the program. That one is like water base clay, and the first one is like red clay or wax. You can also do some painting of the surface with this program, but I haven't really explored that yet. There surely is a learning curve, and it does help if you have some real clay sculpting experience.

Even though I like some of the high tech new tools, I still greatly enjoy the traditional materials. I may create some character concepts with digital sculpting, but then I will sculpt the actual head in real water base or oil base clay, or in basswood. There are small (or sometime larger) changes that I will make as I see the need when doing the actual sculpt, that I might not even see in the digital sculpt.

Who knows, maybe at some point I will print out one of these concepts on a 3D printer. Jeff Dunham has already done that and showed some examples at the 2011 Vent Haven Ventriloquist Convention. I haven't seen these yet first hand, but would be quite interested in seeing the quality and what is possible. Sometimes I find technology very fascinating. Other times I want to go as low tech as possible! 

In any case, I thought the free digital sculpting program, Sculptris, could be a tool that others might find interesting or useful in their figure making endeavors.

Saturday, September 24, 2011

Winker Mechanisms Can Be Fun?!?

Yeah, I know. You must think I'm crazy if I think winker mechanisms can be fun! Actually there is a real good reason for the title of this blog post. Long before I ever had my blog going, I had talked to many aspiring figure makers across the country and around the world, and found that there are many who are VERY interested in the subject of winker mechanics. The reason? They can be quite the challenge, both to beginning and experienced figure makes alike!

And since starting this blog, I have gotten a lot of private response about my posts on blinkers as well. Particularly I've found the most interest in shell winker mechanisms. They take the most precision, and it doesn't take much in the way of errors to have a poor or non-functioning winker mechanism, even after a lot of hard work! How does a professional figure maker handle these challenges? I know when I was first learning, I surely wanted to know.

How does one make a successful mechanism each and every time? Making a living full time as a figure maker for a number of years, and installing quality winker mechanism on a daily or weekly basis, I've had to learn how to do that or starve. (grin)  So over time I've developed some sure fire ways to consistently create precise winker mechanics. After giving it much thought, I've decided to share my techniques in a brand new 98 page book specifically on shell winker mechanics.


If you think 98 pages is a lot on just the subject of shell winker mechanics, it is! That's because this is really an in-depth book with numerous, full size, large, clear photos of all the different steps involved. I think you will be amazed at the detail. To keep the price affordable (an all color book full of quality photos can be expensive to publish), I've compiled it into a high-quality PDF E-Book and it is available for instant download.  I think you will be pleased with how much information is in this one volume.

So if you've ever struggled with shell winker mechanics before, or have put off trying it because you thought it was too difficult, or you just want more quality information to improve what you are currently doing, this new in-depth book on the subject should help a lot! You can find out more about it on our web site. . .


Tuesday, September 13, 2011

A Fresh New Face. . . .

I've been working on a few new characters, but all has been on the back burner for awhile due to extenuating circumstances.  I've had this one close to being done for some time now, but he has had to be patient until I could get a few spare moments to finish him. He said he was now ready for his unveiling, so here's a sneak peek. . . .


His name is 'Sparky' and I sculpted this cute face based on a character concept drawn for me by LaFonstsee Character Design. Edit: We originally were going to make this part of a new line of characters that were greatly simplified, but have since decided to just make him part of our regular line of figures to keep things simple in the workshop.


Let me know what you think of this little guy!

Saturday, September 3, 2011

Blast from the Past. . . .

What a lot of people don't know about me is that I was a top piano tuner-technician-rebuilder for some 30 years. I was considered one of the top 3 piano techs in Orange County California. What does this past experience as a piano tech have to do with being a quality figure maker? I'll explain in a moment.

Early on (1977) I became the piano tuning manager for Fullerton Music, Fullerton CA, then after about 4 years became the manager over at Kay Kalie Music in Anaheim CA, which was an authorized Yamaha piano dealer. Here's an old pic of me tuning a nice Yamaha upright piano at that store. . . .


I was a lot younger and had a lot more hair! (grin) During my time working for this fine music store I had the privilege of attending the Yamaha 'Little Red School House', which is an intensive, hands on, high level training program (there was a 3 year waiting list for techs to get in at the time) with some of the top piano technicians in the country as the instructors. I became an authorized Yamaha technician. Here I am with one of the instructors, LaRoy Edwards. . . .


That's me regulating (adjusting) the mechanism on a Yamaha grand piano (the whole mechanism slides out as one unit so you can work on it). Later, I also did an intensive training program at the 'American Institute of Piano Technology' in Los Angeles, where we took pianos apart (all brands, all sizes) as far as they come apart, and put them back together again! After only two years of being there, I was asked to be one of the instructors and to serve on the board of directors. What a grand honor that was!

I also learned a ton through years of constant education through the Piano Technicians Guild, which had some very strict testing of your tuning, regulating and repair skills in order for one to be considered a Craftsman Member of the Guild. . . .


In my 30 year piano tuning-tech-rebuilding career I serviced well over 10,000 instruments. Makes my ears tired just to think about it! (grin) I serviced or tuned everything from the smallest spinet piano or harpsichord all the way up to 9 foot concert grand pianos, player pianos, and reproducing pianos (automatic player grand piano that plays with full expression), etc. From Steinways to Bösendorfers with more than 88 keys, and everything in between!

So what does this experience have to do with becoming a quality figure maker. For me, a lot! As a top piano tech and rebuilder, I spent years working regularly on very complex mechanisms where a few thousandths of an inch can make a difference in how well the instrument performs. A lot of these instruments are far more complex than some of the most complicated ventriloquist figures out there. I learned what makes the difference between a quiet, smooth operating, quality mechanism and one that is noisy, binds, and will not hold up well over time. All of this experience has helped prepare me for building quality mechanisms that can stand the test of time.

So then, does one have to have been a piano tuner-technician to become a good figure maker? No. But it sure can help! (grin) This is just one aspect of my past that has helped me to do what I do now, and do quality work. And for me that is the only way of doing a job.