Saturday, September 24, 2011

Winker Mechanisms Can Be Fun?!?

Yeah, I know. You must think I'm crazy if I think winker mechanisms can be fun! Actually there is a real good reason for the title of this blog post. Long before I ever had my blog going, I had talked to many aspiring figure makers across the country and around the world, and found that there are many who are VERY interested in the subject of winker mechanics. The reason? They can be quite the challenge, both to beginning and experienced figure makes alike!

And since starting this blog, I have gotten a lot of private response about my posts on blinkers as well. Particularly I've found the most interest in shell winker mechanisms. They take the most precision, and it doesn't take much in the way of errors to have a poor or non-functioning winker mechanism, even after a lot of hard work! How does a professional figure maker handle these challenges? I know when I was first learning, I surely wanted to know.

How does one make a successful mechanism each and every time? Making a living full time as a figure maker for a number of years, and installing quality winker mechanism on a daily or weekly basis, I've had to learn how to do that or starve. (grin)  So over time I've developed some sure fire ways to consistently create precise winker mechanics. After giving it much thought, I've decided to share my techniques in a brand new 98 page book specifically on shell winker mechanics.


If you think 98 pages is a lot on just the subject of shell winker mechanics, it is! That's because this is really an in-depth book with numerous, full size, large, clear photos of all the different steps involved. I think you will be amazed at the detail. To keep the price affordable (an all color book full of quality photos can be expensive to publish), I've compiled it into a high-quality PDF E-Book and it is available for instant download.  I think you will be pleased with how much information is in this one volume.

So if you've ever struggled with shell winker mechanics before, or have put off trying it because you thought it was too difficult, or you just want more quality information to improve what you are currently doing, this new in-depth book on the subject should help a lot! You can find out more about it on our web site. . .


Tuesday, September 13, 2011

A Fresh New Face. . . .

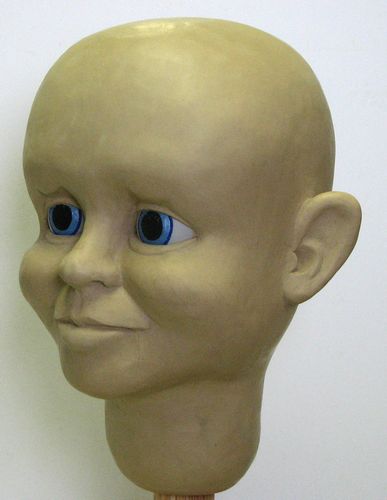
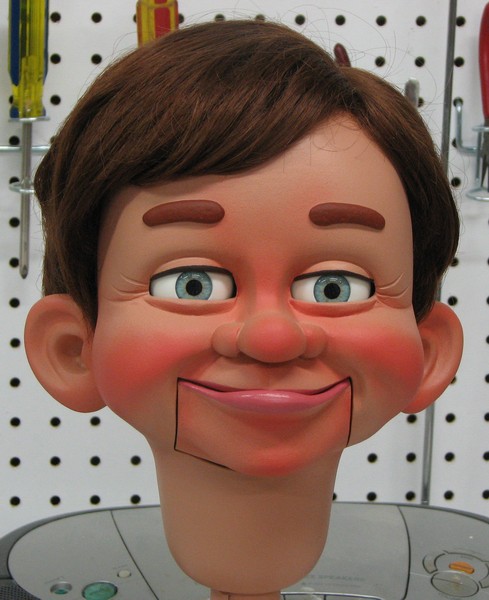
I've been working on a few new characters, but all has been on the back burner for awhile due to extenuating circumstances.  I've had this one close to being done for some time now, but he has had to be patient until I could get a few spare moments to finish him. He said he was now ready for his unveiling, so here's a sneak peek. . . .


His name is 'Sparky' and I sculpted this cute face based on a character concept drawn for me by LaFonstsee Character Design. Edit: We originally were going to make this part of a new line of characters that were greatly simplified, but have since decided to just make him part of our regular line of figures to keep things simple in the workshop.


Let me know what you think of this little guy!

Saturday, September 3, 2011

Blast from the Past. . . .

What a lot of people don't know about me is that I was a top piano tuner-technician-rebuilder for some 30 years. I was considered one of the top 3 piano techs in Orange County California. What does this past experience as a piano tech have to do with being a quality figure maker? I'll explain in a moment.

Early on (1977) I became the piano tuning manager for Fullerton Music, Fullerton CA, then after about 4 years became the manager over at Kay Kalie Music in Anaheim CA, which was an authorized Yamaha piano dealer. Here's an old pic of me tuning a nice Yamaha upright piano at that store. . . .


I was a lot younger and had a lot more hair! (grin) During my time working for this fine music store I had the privilege of attending the Yamaha 'Little Red School House', which is an intensive, hands on, high level training program (there was a 3 year waiting list for techs to get in at the time) with some of the top piano technicians in the country as the instructors. I became an authorized Yamaha technician. Here I am with one of the instructors, LaRoy Edwards. . . .


That's me regulating (adjusting) the mechanism on a Yamaha grand piano (the whole mechanism slides out as one unit so you can work on it). Later, I also did an intensive training program at the 'American Institute of Piano Technology' in Los Angeles, where we took pianos apart (all brands, all sizes) as far as they come apart, and put them back together again! After only two years of being there, I was asked to be one of the instructors and to serve on the board of directors. What a grand honor that was!

I also learned a ton through years of constant education through the Piano Technicians Guild, which had some very strict testing of your tuning, regulating and repair skills in order for one to be considered a Craftsman Member of the Guild. . . .


In my 30 year piano tuning-tech-rebuilding career I serviced well over 10,000 instruments. Makes my ears tired just to think about it! (grin) I serviced or tuned everything from the smallest spinet piano or harpsichord all the way up to 9 foot concert grand pianos, player pianos, and reproducing pianos (automatic player grand piano that plays with full expression), etc. From Steinways to Bösendorfers with more than 88 keys, and everything in between!

So what does this experience have to do with becoming a quality figure maker. For me, a lot! As a top piano tech and rebuilder, I spent years working regularly on very complex mechanisms where a few thousandths of an inch can make a difference in how well the instrument performs. A lot of these instruments are far more complex than some of the most complicated ventriloquist figures out there. I learned what makes the difference between a quiet, smooth operating, quality mechanism and one that is noisy, binds, and will not hold up well over time. All of this experience has helped prepare me for building quality mechanisms that can stand the test of time.

So then, does one have to have been a piano tuner-technician to become a good figure maker? No. But it sure can help! (grin) This is just one aspect of my past that has helped me to do what I do now, and do quality work. And for me that is the only way of doing a job.

Tuesday, August 30, 2011

Anatomy of a Custom Figure - Part Two

In the first installment I showed the concept art developed by character designer Larry LaFontsee and the special armature I made just for this project. I did not get any photos of the clay sculpt as it progressed unfortunately, because so often as I get sculpting, I don't think about getting a camera out. Here are some photos of the sculpture well along. . . .


The customer picked 3 of the drawings from Larry LaFontsee, and I had him pick out which features he liked best from each of those. So then I proceeded to sculpt a face incorporating each of these features and creating a composite face. As time went on, and more conversations with the customer, it was decided to make a few small changes in the clay sculpt. One of the changes was to make the neck regular size instead of the exaggeratedly small neck in the original concept. Here are a few pics of that the updated clay sculpture. . . .

 
Next a quick mold was made and then the head was cast in resin. I also made some custom eyes for this figure with larger irises (the eyes in the clay were just a mock up for reference to sculpt around), 3/4 of an inch in diameter. There was one more change made when we got into the casting stage of the project. It was decided to make the mouth bigger for better visibility (usually desirable on a pro vent figure) and more closely resembling the mouth of the real little girl. Here is an early pic of the casting. . . .


One more subtle change was made in the sculpt at this stage. Instead of a neutral expression, a little bit more of a smile was added per the customers request. Finally, the head was fully sanded, primered, painted, and the eyes and winkers were installed. Here are some pics of her currently. . . 


This is where is starts getting exciting and you know that all your hard work is paying off. I sent these photos off to the customer and here's what he had to say, "The face is perfect. What you have been able to do, is remarkable. You have managed to capture all of her different looks, ...in one figurine. It is not your typical dummy. This dummy has facial expression, just like my God daughter. Now, I'm really excited, I hardly know what to say."

That's what makes it all worthwhile!!! I have yet to install her up/down eyebrows, finish her mechanics, wig her, and finish her body. But it won't be all that long and this cute little figure will be in the customer's hands.

I hope this little peek into the 'Anatomy of a Custom Figure' has been of interest. 

Anatomy of a Custom Figure - Part One

Most people never get to see some of the 'behind the scenes' steps involved in the development of a custom figure. Thought some might enjoy getting a taste of that process. I have a customer who wanted a custom figure that looked like his goddaughter, and wanted a nice caricature of her.

On occasion I will consult with or consign a fellow artist or colleague, and felt this was the perfect project to utilize that kind of help. I called on fellow figure maker and character designer Larry LaFontsee of 'LaFontsee Character Design'. I sent Larry several photos (provided by the customer) of the little girl in question, and set him free on doing a caricature suitable for a custom little girl vent figure. (These are all copyrighted by Larry LaFontsee.)

When Larry sent me the sketches he had done, I was bowled over! I knew he was talented in this department, but didn't realize just how talented he was. Here are a few of the sketches he did for me. . . .


These are just a few of the drawings Larry sent me. I was absolutely amazed at the variety of caricature styles that he came up with. He is one of the most creative character designers out there, I think. In any case, he gave me a plethora of material to work with, which is always better than not having enough to work with. I then got to work on it. I created an armature just for this project. I lathed a smaller than usual neck piece, and tried something new for this armature. I set in small dowels with markers on them, so I would have proportion references during the roughing out of the clay model. Here are some pics of the armature. . . .


The armature worked very nicely and the dowels with the markers came in quite handy. Saves some time in the rough sculpting stages and keeps you on track. So then wads of oil based clay began to be added to the armature. In the next installment, Part Two, I will show you the clay sculpture and the figure of her that's almost complete.

Saturday, August 27, 2011

It's All in the Style. . .

Puppets and Props now offers two styles of vacuum formed styrene winker shells. We now have both a tabbed version and a tab-less version available for purchase on our web site for our customer's convenience. . .


You now have a choice, depending on what building style you prefer. There is more information on our web site on our eyes and winker shells page. . . .


So which style should you choose? I thought that was an awfully good question, that deserved a somewhat in depth answer. Inquiring minds want to know! <G> So I created a page on our web site which explores that question and helps those wondering, with some basic information on the two styles, which explores why and how they might be used. Here's the web page for that. . . .


There's a least a couple of photos on that page that figure builders might find interesting, so you might hop on over there for a few minutes just for that, even if you have no interest in tabbed or tab-less winker shells at the moment.

Saturday, August 20, 2011

It's All in the Controls. . . .

I've been working with wood since I was 12 or 13. My dad bought a 'Shopsmith' multi-purpose woodworking tool way back then, which I still have and use to this day. Of course it has been completely rebuilt with new variable speed motor and all. So, making high quality control sticks out of wood was surely not too big a stretch, and I always enjoy working with wood. Here's some examples of some wood control sticks I fabricated on the old Shopsmith.........


May not look like much, until you realize they are hollow from top to bottom, so that any controls that you would like interior mounted, they have a place to go. Actually that's the hardest part of the process. I mean, making precision slots for the controls has its own challenges, but the hollowing out of the control stick can be a trick. Here's a photo that will give you more of an idea of what I'm talking about. . . .


The trick is first of all getting the hole fairly well centered, not only at either end, but on into the middle of the control stick as well. I will show the technique and jig for that in an upcoming instructional DVD I will be doing (as well as the slot milling process).

But that's not to minimize the work involved in milling the slots for the control levers. There's a lot of precision involved there as well. Whether doing all rod control like I did on this figure here. . . .


. . . .or a combination of rod control and cord control mechanics, its still nice to do quality workmanship on the wood slots, lever pivot holes and such. . . .


 Needless to say, fabricating high quality wood control sticks takes a lot of time, effort, and skill to make. And you fight with the wood a lot of times trying to convince it to behave while you are milling, drilling, etc., without splitting, splintering or other fun things that can happen along those lines.

What a lot of people don't know is that I've also been making composite control sticks for some time. A long while back, I knew that I could make some high quality composite control sticks, it would just take some mad 'model making' and 'mold making' skills to accomplish it.  Here's a picture of one of those. . . .


I like them in the ebony color, but they don't show up so well in photos, so I have a neutral one next to it so you can better see what is there. These are very high quality and very strong. They won't shrink and swell like wood can (although they have a wood grain pattern molded in). They won't splinter or crack. And the best part? All the slots, pivot holes for the levers and the pocket holes at top are all automatically cast in place! Way cool, as they say!! Here's some pictures of a composite control stick on one of my figures. . . .


The interior mounted direct linkage jaw mechanism works effortlessly. The interior mounted eye control rod works pretty slick as well. The control stick has some internal flanges made for perfect placement of the eye control rod, and causes the brass lever to be centered up/down wise, so it does not rub anywhere on the milled slot.

Sorry for such a long post. I originally was only going to do something on the composite control sticks, but thought a little background with the wood control sticks might be of interest as well.